
Image gallery and displaying images
Navigation: Main menu → Image Display (the home page when you open the management interface)
The "Image Display" page is the one you'll use most day to day: upload images, preview them, adjust rotation and fit, and manually display an image on the cholesteric LCD panel.
Page layout
| Area | Location | Purpose |
|---|---|---|
| Top-right buttons | Page title bar | Clear screen, Refresh QR Code (only icons at phone width) |
| Preview box | Left (top on phones) | Shows the selected image in the same aspect ratio as the panel. Tap the image to display it on the panel |
| Edit controls | Below the preview box | Orientation tag, Rotate Image, Adjust Fit Mode, Download Original |
| Image gallery | Right (bottom on phones; scroll down) | All uploaded images |
- On wide screens (about 1200 px or more), the preview box and the image gallery sit side by side; on narrower screens they're stacked.
- When they sit side by side, you can drag the divider between them to change their widths; the number of thumbnails per row in the gallery follows. The browser remembers the width you set.
- On a phone, after you tap a thumbnail in the image gallery, the page scrolls back to the top so you can see the preview box now shows that image.
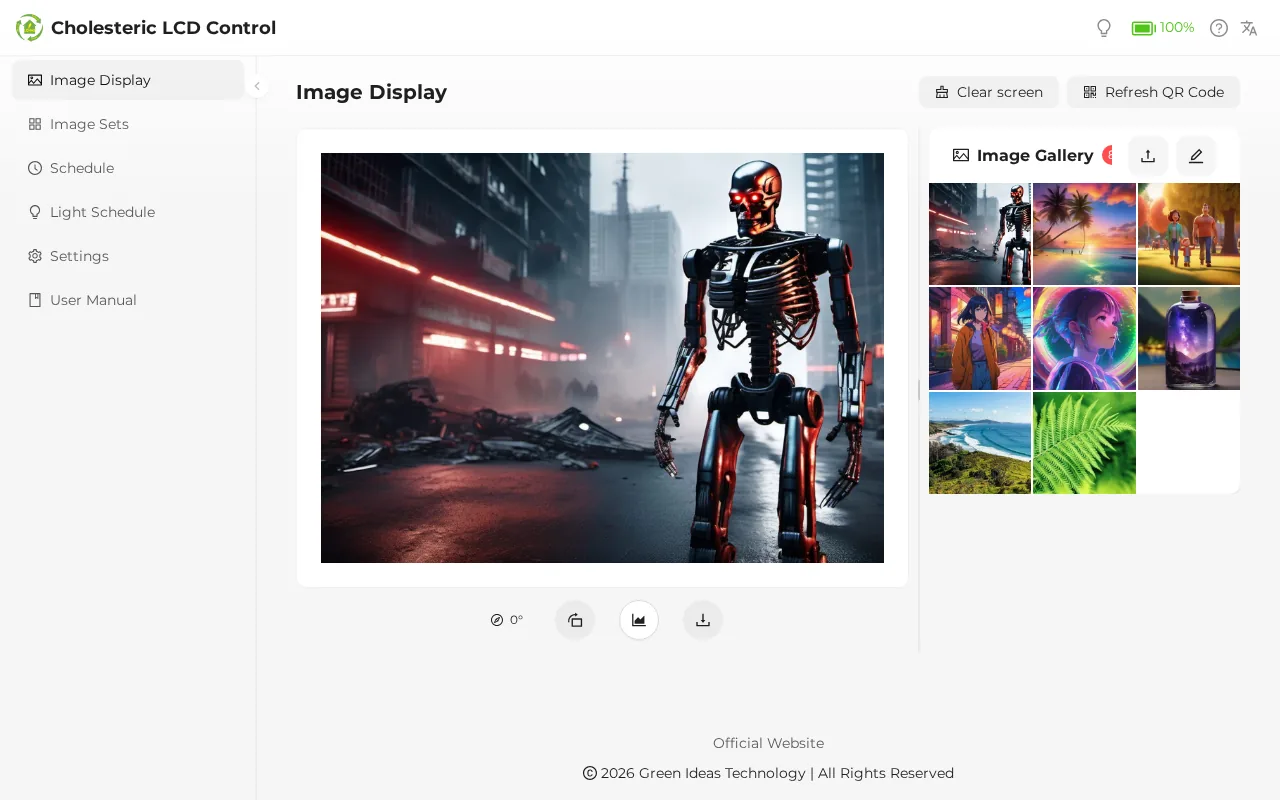
Image gallery
The number next to the image gallery title is the total number of images. Images are shown as a grid of thumbnails, with the most recently uploaded first. The image gallery currently doesn't support drag-and-drop reordering.
- On a computer, hovering over a thumbnail shows the rotation angle (for example
90°), the fit mode (FIT/FILL/STRETCH/CROP), and the original file name (if it is too long, only one line is shown, cut off with "…"). Phones have no hover state, so these tags aren't visible there. - The thumbnail currently being refreshed to the panel is covered by a spinner.
- When several people (several phones) have the management interface open at once, any upload, deletion, or image setting change by one person updates everyone else's screen automatically.
- If a thumbnail fails to load, a gray image icon is shown.
- When the image gallery is empty, it shows "Click the "↑" button to upload images".
Thumbnails don't rotate
A thumbnail is created only once, at upload. If you later change the angle with "Rotate Image", the thumbnail keeps its original orientation. To see the actual angle, check the preview box or the angle tag shown on hover.
Upload images
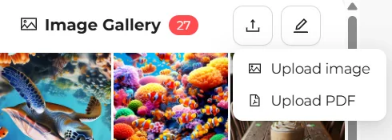
- Tap Upload (the up-arrow icon) at the top right of the image gallery.
- Choose Upload Images from the menu. (For "Upload PDF", see PDF collage.)
- Select images in your phone's or computer's file picker. You can select several at once.
- Each image shows its upload progress at the front of the image gallery (a circular percentage plus "Uploading..."). The system uploads at most 2 images at the same time; the rest wait in line.
- When everything is done, the result appears:
- All succeeded: "All images uploaded successfully"
- Any image failed: "Upload completed, some images failed", and the failed image shows a red ✕ and "Upload failed"
After uploading, the image gallery reloads automatically. You don't need to refresh the page.
Supported formats and sizes
| Item | Specification |
|---|---|
| Recommended formats | JPG, PNG (most common, best compatibility) |
| Also supported | BMP, GIF (first frame only), WebP, TIFF |
| Not supported | SVG (shows an upload failure), HEIC/HEIF (the iPhone's default photo format) |
| File size | No MB limit |
| Image dimensions | Up to about 80 million pixels (80 MP), for example 10000 × 8000. JPG can handle larger photos (the system scales them down while decoding), for example photos taken in a phone's 200-megapixel mode can be uploaded too; PNG and BMP fail if they're over the limit |
| Number of images | No software limit; limited by the device's storage space |
| File name | Up to 255 characters |
iPhone photos
iPhones take photos in HEIC format by default. When you pick images straight from the Photos app, iOS usually converts them to JPG before uploading. If the upload fails, go to iPhone "Settings → Camera → Formats" and choose "Most Compatible", or convert the photos to JPG first.
PNGs with transparent backgrounds
The panel has no concept of "transparent", so transparent areas of a PNG become a solid color (usually black). If you need a white background, fill the transparent background with white on your computer before uploading.
Portrait photos taken on a phone
The system automatically straightens photos based on their built-in orientation information (EXIF), so you don't need to rotate portrait photos taken on a phone manually.
Common reasons uploads fail
| Symptom | Cause | What to do |
|---|---|---|
| "Upload failed" + "Response status:400" | The file isn't an image, or it's an SVG | Use JPG/PNG instead |
| "Upload failed" + "Response status:413" | The image has too many pixels (PNG, BMP, etc. over about 80 million) | Reduce the image dimensions before uploading |
| "Upload failed" + "Response status:500" | The file is damaged, the format can't be read (for example HEIC), or the device storage is full | Export it again as JPG; check the free space in Device info |
| "Lost connection to the device" | Your phone left the device hotspot or the connection dropped | Reconnect to the device hotspot and upload again |
When you upload large images, the system converts only one image at a time, so displaying and previewing images may be a little slower during that time. This is normal.
Preview images
Tap any thumbnail in the "Image Gallery", and the preview area simulates how that image will look when refreshed on the panel (with rotation, scaling, and cropping applied). Note: for actual display colors and the edge mask, check the physical panel.
- Tapping a thumbnail only changes the preview. It does not display the image on the panel.
- The preview box's aspect ratio changes instantly with the device's orientation (G-Sensor).
- The preview box shows a scaled-down version, at most 800 pixels on the long side; the panel uses the full resolution.
- When you change images, the preview box first shows a blurry small thumbnail, then switches to the sharp image once the preview is ready.
- On the 32-inch frameless model, the black frame from the "Edge Mask" does not appear in the preview, only on the panel.
When you open the page, the preview box shows what the panel currently displays:
| Preview box shows | Meaning |
|---|---|
| An image | The panel currently shows this image |
| "Currently showing the QR code startup screen" | The panel currently shows the startup connection screen |
| "Screen is currently blank (reset)" | The screen has been cleared, or the device restarted and hasn't displayed any image yet |
Whenever any source starts refreshing the panel (web page, schedule, physical button, device rotation), the preview box automatically switches to the image being refreshed.
Edit controls
On wide screens the controls are always expanded; on phones and tablets they're collapsed by default. Tap the gray bar below the preview box to expand or collapse them. Until you select an image, the buttons are grayed out and can't be tapped.
| Control | Description |
|---|---|
| Orientation tag (compass icon + angle) | The device's current orientation (detected by the G-Sensor), not the image's rotation angle. Shown in blue when it isn't 0°; hover to see the current effective resolution |
| Rotate Image | Each tap rotates 90° clockwise (0° → 90° → 180° → 270° → 0°) |
| Adjust Fit Mode | Opens four options: "Fit/Fill/Stretch/Crop" |
| Download Original | Downloads the original file you uploaded (with the same file name as when it was uploaded) |
Rotate Image
Each tap of Rotate Image rotates the image 90° clockwise. On success you'll see "Image rotated to 90°".
- Rotation doesn't change the original file. It only records "how many degrees to rotate this image", so you can rotate it back at any time.
- The rotation angle is stored with the image itself: from then on, whether the image is displayed manually, by a schedule, or with a button, this angle is used.
- After rotating, the panel doesn't refresh automatically. Tap the preview box again to display it on the panel.
Fit mode
When an image's aspect ratio differs from the panel's, the system uses the "fit mode" to decide how to place it on the screen:
| Mode | Effect | Best for |
|---|---|---|
| Fit (default) | Shows the whole image without distortion; leftover edges are filled with black | Posters and images with important text that must not be cropped |
| Fill | Enlarges the image to fill the whole screen without distortion; the overflow is cropped from the center outward | Photos and backgrounds |
| Stretch | Stretches the image straight to the panel size, which distorts it | Images whose aspect ratio is already almost the same as the panel's |
| Crop | Same effect as "Fill" | Same as "Fill" |
On success you'll see "Fit mode changed to "Fill"". As with rotation, the setting is stored with the image and doesn't refresh the panel automatically. For details on processing, see How images are processed.
Tips for creating images
Create images at the panel's effective resolution (for example, a 1920 × 1080 panel in portrait is 1080 × 1920). Then no cropping or padding is needed, and you get the best result. For each model's resolution, see Models and specifications.
Display an image on the panel
- Select the image you want in the image gallery and check how it looks in the preview box.
- Tap the image in the preview box.
- The "Confirm Display" window appears: "Are you sure you want to refresh this image to the cholesteric LCD screen?" Tap Display Now.
- "Command sent, processing in background..." appears, and the preview box shows the panel's current stage in turn:
- Preparing, Powering on, Starting up: a spinner
- Transferring: a progress bar showing how much of the image has been sent to the panel
- Refreshing: a scan line sweeps across the preview in the same direction and at the same pace as the panel; the picture brightens as it finishes
- Agitating: an extra step after refreshing on some panels
- When the panel finishes refreshing, the stage display disappears. The expected time adjusts itself to the recent refreshes on this device.
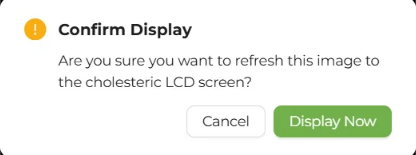
"Command sent" doesn't mean "already refreshed"
The message in step 4 only means the device has received the command and started processing it. The panel's actual refresh takes a while (it depends on the model and refresh mode, for example about 6 seconds on the 13.3-inch, about 16 seconds on the 27.6-inch, and about 20 seconds on the 32-inch; the first time you display an image, converting it takes a little extra time). Wait until the stage display disappears from the preview box before doing anything else.
When the panel is busy
The cholesteric LCD panel can refresh only one image at a time, and the device doesn't queue requests: any new request received during a refresh is rejected immediately.
- The web page shows "Send failed, device may be busy", usually along with "Response status:409".
- The device's status LED blinks briefly to show it's busy (see Status LEDs).
- Actions that use the panel include: displaying an image from the web page, clearing the screen, refreshing the QR code, a schedule changing the image, switching images with a physical button or the presenter remote, and automatic redrawing after the device is rotated. While any of these is in progress, the others are rejected.
- Exception: page changes from the physical buttons and the presenter remote are not rejected; depending on the "When changing pages" setting, they stop the current refresh or wait for it to finish. See Physical buttons and gestures.
What to do: Wait for the current refresh to finish ("Refreshing..." disappears from the preview box and the status LED returns to standby), then try again.
When a refresh fails
When a refresh fails (for example, because the panel cable is loose), the web page shows "The screen could not be refreshed. Please try again later; if it keeps happening, check the system logs." The spinner disappears and the panel doesn't change. You can also check in these ways:
- Status LED: when a refresh fails, the LED blinks 3 times (red blinking on full-color LED models). See Status LEDs.
- System logs: go to System Logs and filter by the "ERROR" level to see why it failed.
For troubleshooting, see Troubleshooting: display and displaying images.
Clear screen
Tap Clear screen at the top right of the page (this runs an M0 Reset; depending on the panel/firmware, the resulting background may be white or black), and the panel is cleared to a single background color.
- Success: "Screen cleared", and the preview box shows "Screen is currently blank (reset)".
- Failure or panel busy: "Failed to clear the screen".
- After clearing, the panel keeps this background color until the next time an image is displayed or a schedule changes the image.
When to use it: to clear the screen before long-term storage, to start fresh when ghosting appears, or when you don't want to show anything for a while. For the full long-term storage steps, see Power control and storage.
Refresh QR Code
Tap Refresh QR Code at the top right of the page, and the panel shows the startup connection screen again (QR codes for Wi-Fi and the management page). How long it takes depends on the model and refresh mode, for example about 6 seconds on the 13.3-inch, about 16 seconds on the 27.6-inch, and about 20 seconds on the 32-inch.
- Success: "QR Code screen refreshed", and the preview box shows "Currently showing the QR code startup screen".
- Failure or panel busy: "Failed to refresh QR Code screen".
When to use it: to let other people on site scan the code with their phones to connect. You can also trigger it with a physical button gesture; see Physical buttons and gestures.
Screen clears and QR codes triggered from other sources
When the screen clear or QR code is triggered by a physical button, before sleep, or before shutdown, the matching button on the web page also shows a spinner, but the success/failure message appears only in the browser where someone actually tapped the button.
Delete images
- Tap the pencil icon at the top right of the image gallery to enter edit mode.
- Tap the images you want to delete (you can select several; selected thumbnails shrink and get a check mark at the top left).
- Grid icon: select all; tap it again when all are selected to deselect all.
- Tap the red trash can (the number at its top right is how many are selected; it can't be tapped when nothing is selected).
- Confirm "Are you sure you want to delete N selected image(s)?" and tap Delete.
- On success you'll see "Successfully deleted N image(s)", and edit mode closes automatically.
To cancel, tap ✕ at the top right to leave edit mode.
Deleting images also affects
- The images are removed from all image sets. The confirmation window lists "These images will also be removed from the following image sets:", with "N removed, M left" for each image set. An image set that becomes empty is marked "Will become empty", and if a schedule is using it, you're warned "Will become empty; N schedule(s) using it will have nothing to show".
- Schedules that use those image sets start again from the first image of the set next time.
- Deleting does not change what the panel currently shows; the panel keeps showing the same image until the next image change.
- Deletion can't be undone. If you need the images, back them up first with "Download Original".
Download Original
Select an image and tap Download Original in the edit controls to download the original file you uploaded, with the same file name as when it was uploaded. Images created by a PDF collage download with the PDF's file name (for example menu.jpg, menu-1.jpg).
Messages
| Message | Meaning |
|---|---|
| All images uploaded successfully | All images have been added to the image gallery |
| Upload completed, some images failed | At least one failed; check the status of each image |
| Command sent, processing in background... | The device has accepted the display command and the panel is refreshing |
| The screen could not be refreshed. Please try again later; if it keeps happening, check the system logs. | The panel refresh failed; see When a refresh fails |
| Send failed, device may be busy | The panel is handling another refresh; try again later |
| Image rotated to N° / Image rotation failed | Result of the rotation setting |
| Fit mode changed to "…" / Fit mode change failed | Result of the fit mode setting |
| Successfully deleted N image(s) / Deletion failed / Batch deletion failed, please try again later | Result of the deletion |
| Screen cleared / Failed to clear the screen | Result of clearing the screen |
| QR Code screen refreshed / Failed to refresh QR Code screen | Result of refreshing the QR code |
| Response status:number | An error code returned by the device, often shown together with the messages above; see the message reference |
Related sections: How images are processed, PDF collage, Image sets, Troubleshooting: display and displaying images