
Image sets
Navigation: Main menu → Image Sets
An image set is "an ordered list of images". Schedules and the physical buttons both step through images one after another in the order of an image set. The images themselves are stored in the image gallery; an image set only records "which images are used and in what position".
Wording on screen
The management interface calls it "Image Set" everywhere. Some places on schedule cards and in button settings in older versions said "photo set"; it means the same thing.
Image sets and the image gallery
| Item | Description |
|---|---|
| One image can go into several image sets | Yes. For example, the same notice image can be in both a "Weekdays" and a "Weekends" image set |
| The same image twice in one image set | No. Images already in the image set are skipped when you add them, and you can't select them again on the selection screen |
| Removing an image from an image set | Only takes it off the list; the image stays in the image gallery |
| Deleting a whole image set | Only deletes the list itself; the images stay in the image gallery |
| Deleting an image in the image gallery | The image is automatically removed from all image sets |
| Number of image sets, number of images per image set | The software sets no limit; in practice it's limited by the device's storage |
| Image set name | Required, up to 100 characters; names can repeat (but avoid duplicates so you don't pick the wrong one in a schedule) |
Image set list
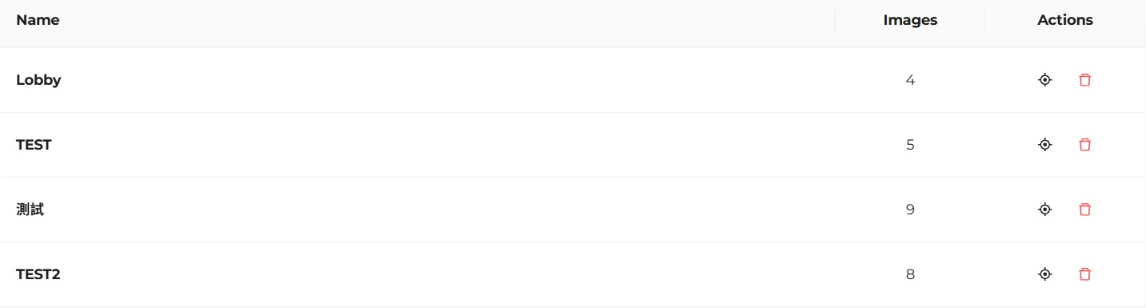
Open "Image Sets" to see all image sets, sorted by creation time, newest first.
| Column | Description |
|---|---|
| Name | Image set name |
| Images | How many images it currently contains |
| Actions | Two buttons: target icon (button binding) and trash can (delete) |
- Click anywhere on a row to open that image set's management screen (there's no separate "Manage" button in the list).
- On a phone-width screen, "Create Image Set" in the upper right shows only a + icon.
Target icon: set as the button-controlled image set
By default, the "Previous" and "Next" physical buttons on the device switch through the whole image gallery. Press an image set's target icon to limit button switching to that image set.
| Action | Message on screen |
|---|---|
| Press the target icon on an unbound image set | Set as the button-controlled image set |
| Press it again on the bound image set (button shown in the theme color) | Unbound, buttons will cycle through the whole gallery |
| Saving fails | Failed to update button binding |
Only one image set can be bound at a time; binding another one automatically replaces the current one. You can also change the same setting under "Bound Image Set" in Physical buttons and gestures.
Create an image set
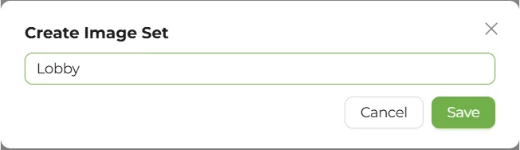
- In the image set list, press Create Image Set in the upper right.
- In the "Create Image Set" window, enter a name (required) and press Save or just press Enter.
- When it's created, "Image set created successfully" appears, and the system opens this image set automatically and opens the image selection window right away.
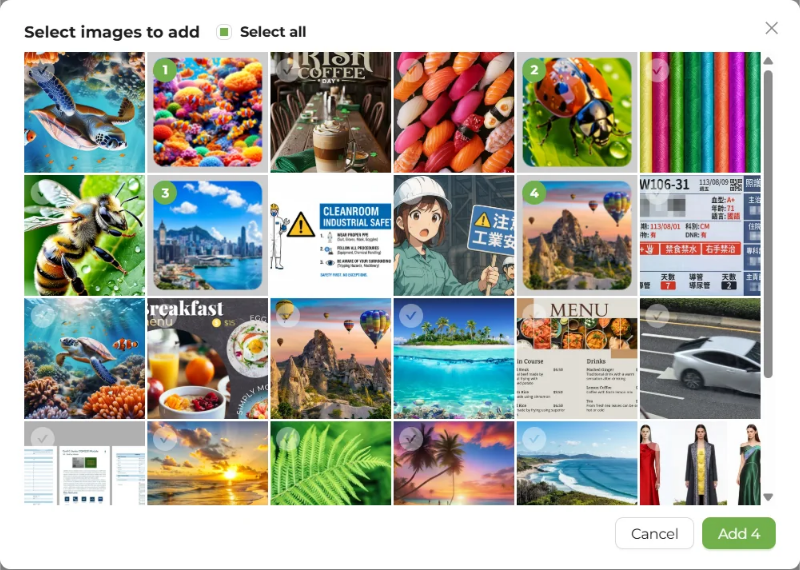
- Check the images you want to add and press Add N.
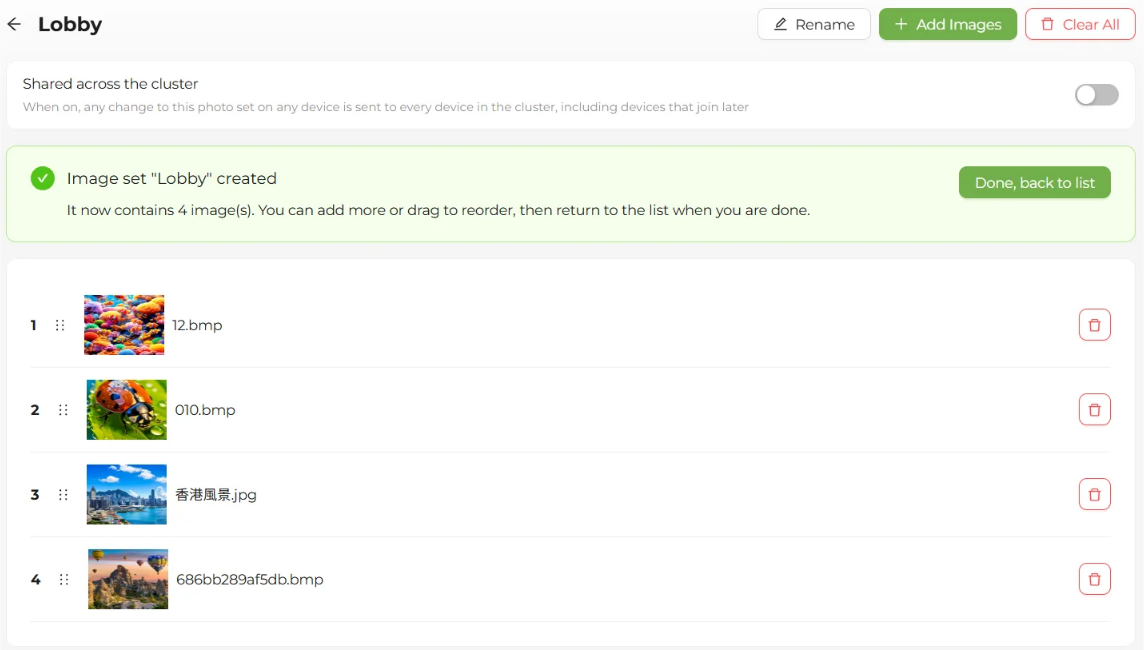
- A notice at the top of the page, 'Image set "name" created', tells you how many images it has. Once the order looks right, press Done, back to list.
The order you add is the order you click
While you select images, each thumbnail shows a number for the order you clicked it; after adding, the images are appended to the end of the image set in that order. If you deselect one in the middle, the numbers after it move up automatically. So to play images in a specific order, just click them in that order; no need to drag them afterward.
Name is required
If the name is empty (or only spaces), "Please enter image set name" appears and the image set isn't created. A name longer than 100 characters shows "Failed to create image set".
Name in the presenter remote menu
The device screen's font includes only some characters. If a name contains characters the screen can't draw, you'll see a hint while typing it: "The presenter menu on the device cannot draw some characters in this name; it will be shown as "Photo set N"." See Presenter remote menu.
You can also create an image set right inside the schedule form while creating a schedule, without leaving the schedule page. See Schedules.
Manage the images in an image set
Click an image set in the list to open its management screen. The title is the image set name; the back arrow in the upper left returns to the list.
Buttons in the upper right:
| Button | Purpose |
|---|---|
| Rename | Opens the "Edit Image Set" window to change the name; on success shows "Image set updated successfully" |
| Add Images | Opens the "Select images to add" window |
| Clear All | Appears only when the image set has images; removes all images at once (the images stay in the image gallery) |
Each image is one row, showing in order: number (starting at 1), drag handle, thumbnail, original file name, and a red trash can. When the image set is empty, it shows "No images in this set".
Add images
- Press Add Images to open "Select images to add".
- Click the images you want to add. Images already in the image set are marked and can't be selected again.
- To select many at once, check Select all next to the title (it selects only images not yet added); press Deselect all to clear the selection.
- Press Add N (the button is disabled when nothing is selected).
- On success, "Successfully added N images" appears; new images are always appended to the end.
If the image gallery has no images yet, the window shows "No available images in gallery". Upload some in the image gallery first.
Change the playback order
Press and hold the drag handle on the left of an image and drag it up or down to change the order (it moves only up and down). The change takes effect as soon as you let go; there's no need to save.
- If it fails, "Reorder failed" appears and the screen reloads to restore the original order.
- The new order takes effect immediately for the next image of schedules and button switching; you don't need to set up the schedule again.
- On a phone, make sure you hold the handle before dragging; swiping on the list just scrolls the page.
Remove a single image
- Press the red trash can on the right of the image.
- In the "Confirm Remove" window (Are you sure you want to remove this image from the set?), press Remove.
- On success, "Successfully removed 1 images" appears.
The image is only taken out of the image set; it stays in the image gallery.
Clear all
Press Clear All → press Clear in the "Confirm Clear" window; on success "Image set cleared" appears. The image set itself and the images in the image gallery are kept.
Delete an image set
- In the image set list, press the trash can on that row.
- Confirmation window: "Are you sure you want to delete this image set? (Images will not be deleted)". Press Delete.
- On success, "Image set deleted" appears.
Deleting an image set a schedule is using
When a schedule or the button switching is using this image set, the confirmation window also warns you:
- "These schedules use this image set. After deleting it they will stop changing images until you choose another image set:", followed by a list of those schedules.
- "This image set is bound to the buttons. After deleting it, the buttons will switch through the whole gallery instead."
After deletion:
- Schedules that use it are not deleted and still trigger on time, but since there's no image set, the image doesn't change; the schedule card shows "No image set selected".
- To make the schedule work again, edit it and choose an image set again (the "Image Set" field is required; you can't save without it).
- The button switching automatically goes back to switching through the whole image gallery.
How an image set decides the "next" image
Schedules and button switching both move forward in image set order:
- The first time, it starts from the first image.
- After that, it moves to the next image each time.
- After the last image, it goes back to the first image and continues.
- If the "current image" has been removed from the image set, the next time starts again from the first image.
- If the image set has only one image, the same image is refreshed every time, so it looks like "the image didn't change". Put at least two images in an image set used by a schedule.
- If a schedule uses an empty image set, nothing is displayed on the panel afterward; if button switching is bound to an empty image set, it automatically goes back to the image gallery.
- After switching to a different image set, the system first checks whether the "current image" is also in the new image set: if it is, it moves on to its next image in the new image set; if not, it starts from the first image of the new image set.
FAQ
Q: Is the order in an image set related to the order in the image gallery? No. Each image set has its own order, and they don't affect each other.
Q: I pressed "Edit Image Set" in the schedule form, and when I came back the form was empty? "Edit Image Set" jumps to the image set management page and leaves the schedule page, so an unsaved schedule form isn't kept. If you only want to add images, press "Choose images" next to it instead; it lets you add them right on the schedule page.
Q: After I delete an image from the image gallery, do I need to tidy up the image sets manually? No. The image is removed from all image sets automatically.
Related sections: Image gallery and displaying images, Schedules, Physical buttons and gestures