
1. Get to know your device
Before you start, get to know the parts of the device you'll be using.
The screen
- The device uses a cholesteric LCD. Once an image is displayed, it stays on the screen even without power.
- Changing an image takes a little time (about 6–20 seconds depending on the model). It's normal to see the screen change gradually while it refreshes.
- It's made for static images such as notices and posters. It can't play videos or animations.
Physical buttons
The device has two buttons: Previous and Next.
| How you press | What happens |
|---|---|
| Press once | Go to the previous / next image |
| Press once while the device is asleep | Wake the device up |
| Hold for about 1.5 seconds | Show the QR code screen for connecting (let go as soon as you see it) |
Don't keep holding a button
Holding a button for 40 seconds erases all images and settings on the device (factory reset). After the QR code appears, let go right away. If you see the LED start flashing quickly, let go immediately as well.
Status LEDs
On models with status LEDs, the LEDs tell you what the device is doing. The table below is for models with two single-color LEDs; the 13.3-inch white model shows its state by color instead, see Status LEDs.
| LED | Meaning |
|---|---|
| Steady on | Idle, working normally |
| Slow blinking | Changing the image, or starting up |
| 2–3 quick flashes | The last action didn't succeed; wait a moment and try again |
| Off | Asleep; press a button once to wake it up |
Sign-post frame models have no status LED; check the management interface instead.
Startup screen
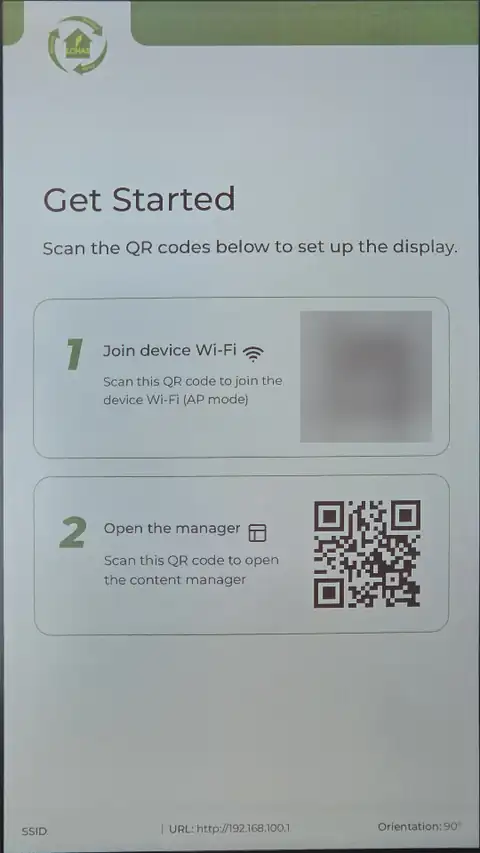
After the device starts, two QR codes appear on the screen. You'll use them in the next step to connect.
Next: 2. Connect with your phone
Learn more: Cholesteric LCD characteristics, Physical buttons and gestures, Status LEDs